Hello, and Happy New Year!
I hope you've all had wonderful holidays filled with fun and happiness. I'm not a party girl personally so I'm snuggled up at home with a yummy Chinese takeaway, and I wanted to do a little post with my hopes for the New Year (I don't want to call them resolutions, too much pressure!). Here they are:
1. Get well.
OK, I'm never going to be 100% well. But I'm looking forward to working with a mental health worker to try and tackle my fatigue and also to try and reduce the impact of my depression. I also need to remember to take my medicine! The goal is to get back to work and to be able to stay in work long-term.
2. Learn to manage money.
No more spending money I don't have, and that includes not falling for all the pretty polishes under the Sun! I endeavour to admire my fellow polishers' beautiful cremes, jellies and glitters without feeling the need to own the polish myself.
3. Lose some weight.
I feel heavy and groggy which can't be helping my fatigue and general health :-) This is tied in with Hope #2: once I have my money in order I'll work out a proper shopping plan for healthy food. The WeightWatchers original points system works for me as I go off the rails without a lot of structure, so that is my plan.
2013 has really not been a good year for me. I've had several bad episodes of depression, been sexually assaulted, had a cancer scare, developed gallstones, had to leave work and my nanna passed away. On the positive side I started volunteering at a wonderful centre for a charity I'm passionate about. I'm also lucky enough to live with parents who support me while I'm ill. Here's hoping 2014 will hold good things!
Hugs,
Lisa xx

Tuesday 31 December 2013
Monday 30 December 2013
Mystery Manicure
Hello!
There will be a nice surprise coming to Geordie Nails in the New Year, and this manicure is a hint! What could it beeeeeeeeeeeeeeeeeeee?

Mysterious hugs,
Lisa xx
There will be a nice surprise coming to Geordie Nails in the New Year, and this manicure is a hint! What could it beeeeeeeeeeeeeeeeeeee?

Mysterious hugs,
Lisa xx
Sunday 29 December 2013
The Geordie Nails 2013 Round-Up
Hello!
2013 has been a year where I've really enjoyed coming up with manicures, being inspired by other polishers and buying way too much stuff! Following in the footsteps of fellow bloggers I've decided to do a little Top 10 of my favorite manis from the past year. You may be able to tell that I really like stamping ;-)
Here we go:
1. Bird & Glitter Manicure

I really love the idea of glittery accent nails with a little stamp, and Models Own's Blueberry Muffin has to be my favourite blue-purple, so this is a top manicure for me!
2. Stormy Sea Clingfilm Manicure

The clingfilm technique is a very easy way to get a beautiful effect on your nails. I tried an ocean-like colour combination and was really happy with it.
3. China Pattern French Tips

Towards the end of the year I developed a taste for French manicures that I'd really never had before! This is a stamped China pattern with full accent nails.
4. Letter to Santa Manicure

I decided to turn my new-found love for French into a Christmas manicure, and so here was my letter to Santa this year!
5. Pink Glitter Gradient
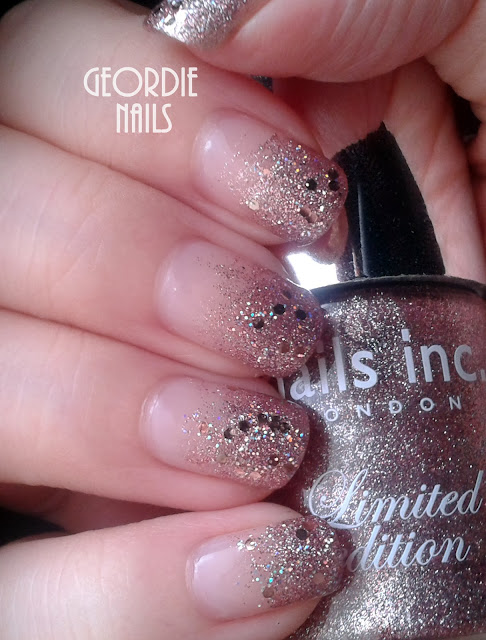
This is another technique where I was pleasantly surprised at how easy it was to do. Simple yet effective and very very sparkly!
6. Butterfly Manicure

The butterfly manicure is a real showstopper for me - when I saw it on other bloggers I just had to get the Nailz Craze plate to be able to have butterfly wings myself.
7. The Coffee Manicure

This is a special manicure in no small part because it includes real gold flakes! I'm also very attached to the Cheeky stamping plate used here <3
8. French Floral Manicure

I've included this manicure because feminine, floral designs on pale base colours pretty much sum up my style!
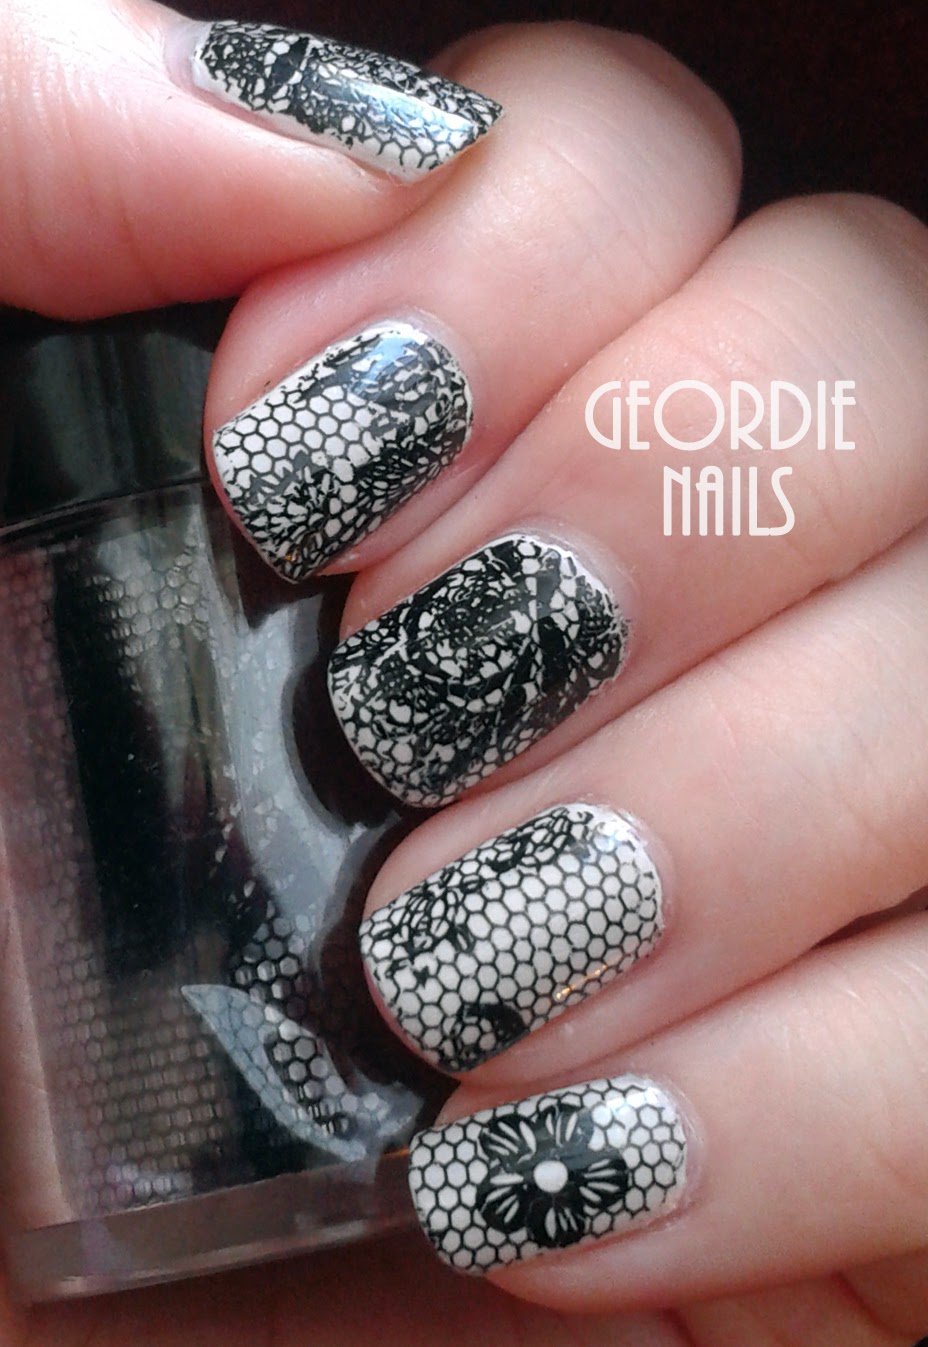
9. Black Lace Nail Foil

This was actually sent to me for review but it's made it into my Top 10 because it's a foil I can see myself using over and over again for delicate and pretty manicures. So romantic.
10. MoYou Manicure

And, finally, I've included this manicure because it uses my Christmas presents and because the birds and the transitioning pink background represent hope for the New Year to me.
Phew! I will be back with a little New Year's Resolution post and also a secret mystery surprise that I am extremely excited about! In the meantime I will be checking out everyone else's New Year posts. Hope you're having great holidays!
Hugs,
Lisa xx
2013 has been a year where I've really enjoyed coming up with manicures, being inspired by other polishers and buying way too much stuff! Following in the footsteps of fellow bloggers I've decided to do a little Top 10 of my favorite manis from the past year. You may be able to tell that I really like stamping ;-)
Here we go:
1. Bird & Glitter Manicure

I really love the idea of glittery accent nails with a little stamp, and Models Own's Blueberry Muffin has to be my favourite blue-purple, so this is a top manicure for me!
2. Stormy Sea Clingfilm Manicure

The clingfilm technique is a very easy way to get a beautiful effect on your nails. I tried an ocean-like colour combination and was really happy with it.
3. China Pattern French Tips

Towards the end of the year I developed a taste for French manicures that I'd really never had before! This is a stamped China pattern with full accent nails.
4. Letter to Santa Manicure

I decided to turn my new-found love for French into a Christmas manicure, and so here was my letter to Santa this year!
5. Pink Glitter Gradient

This is another technique where I was pleasantly surprised at how easy it was to do. Simple yet effective and very very sparkly!
6. Butterfly Manicure

The butterfly manicure is a real showstopper for me - when I saw it on other bloggers I just had to get the Nailz Craze plate to be able to have butterfly wings myself.
7. The Coffee Manicure

This is a special manicure in no small part because it includes real gold flakes! I'm also very attached to the Cheeky stamping plate used here <3
8. French Floral Manicure

I've included this manicure because feminine, floral designs on pale base colours pretty much sum up my style!
9. Black Lace Nail Foil
This was actually sent to me for review but it's made it into my Top 10 because it's a foil I can see myself using over and over again for delicate and pretty manicures. So romantic.
10. MoYou Manicure

And, finally, I've included this manicure because it uses my Christmas presents and because the birds and the transitioning pink background represent hope for the New Year to me.
Phew! I will be back with a little New Year's Resolution post and also a secret mystery surprise that I am extremely excited about! In the meantime I will be checking out everyone else's New Year posts. Hope you're having great holidays!
Hugs,
Lisa xx
MoYou Manicure
Hello!
First of all, I beg your patience while I learn to use my new lightbox (one of the lightbulbs blew so that doesn't help). Thank you!
This manicure was done using some of my Christmas presents. The base polish is Dance Legend's colour changing polish no.178, so I get lovely dark pink tips from the heat reaction. For the stamping I used plates 01 and 05 from MoYou's Mother Nature collection. I stamped birds from both plates and accompanying flowers, and just dotted some gold onto them as a finishing touch.


I had a very average experience with my first and only MoYou buy, but these Mother Nature plates have turned my opinion around completely. The images are stunning and are etched flawlessly. I am very glad I gave MoYou another chance and asked for these for Christmas!
Hugs,
Lisa xx
Friday 27 December 2013
Lisa's Post-Christmas Post!
Hello!
I hope you had a really lovely Christmas and that Santa treated you well! I was extraordinarily lucky as my parents got me a new laptop; I've spent Boxing Day setting everything up and getting my head around Windows 8.
The nail goodies I was given are a Dance Legend colour-changing polish, three beautiful-looking MoYou stamping plates, white stamping polish and cuticle balm. I also now own my very own lightbox! This means that I'll be able to take more consistent pictures for the blog rather than relying on how good the light is in my bedroom or back yard. I'll need practice on how to get the best photos out of it, but to begin with here are a couple of my presents:


Once the holiday excitement is over I have an idea for a new manicure, and I will definitely be posting at New Year. I would love to hear how your holidays are going!
Hugs,
Lisa xx
Tuesday 24 December 2013
Merry Christmas from Geordie Nails!
Hello, and Merry Christmas!
I hope you have had a lovely, cosy Christmas Eve (or a more raucous one if you prefer!). I will be spending Christmas here at home with my very tiny family, and we will finally be putting a tree up on the day itself ~ we haven't been able to earlier as the cat tries to eat it, silly little thing.
Here is the manicure I've been wearing in the couple of days before Christmas. It is OPI's Play the Peonies with glitter accent nails of Nails Inc's Hammersmith and festive water decals sent to me by KKCenterHK.

It is now less than an hour till Christmas here in England! All the best to you and yours, I hope you have a wonderful day.
Hugs,
Lisa xx
Monday 23 December 2013
Femme Fatale ~ Lime Thief
This post contains products which were sent to me for review :-)
Hello!
Today I have for you a lovely indie polish by Femme Fatale Cosmetics called Lime Thief. Whilst not specifically a Christmas polish it is perfect for the season ~ a green sheer base filled with vibrant green and red glitters in varying sizes. A cross between holly and a Christmas tree!
Most people will want to layer Lime Thief over a solid green base colour as it is a sheer polish. However, I don't mind visible nail line and I do like to wear indie polishes in their "natural state", so my photos show 3 coats of Lime Thief on its own.


It really is vibrant - lots of lovely glitter showing through.
Femme Fatale are an online shop based in Australia specialising in sought-after indie polishes. They stock various indie producers' ranges including their own, which includes Lime Thief. They're currently closed for the holidays but check them out in the New Year!
Hugs,
Lisa xx
Sunday 22 December 2013
Russian Doll Manicure
Hello!
I hope you're all enjoying the season! It is so scary that Christmas is only 3 days away ~ where has all the time gone?!
Today's manicure uses the Russian dolls from Nailz Craze's NC03 stamping plate. There was no better place to start than with the creator of the plate herself, so I used Natalie from Nailz Craze's Matryoshka manicure as a guide. The result shows that I need practice but I definitely wanted to show you anyway.
I used OPI My Vampire is Buff as my base colour, and Barry M's Gold Foil on my thumbs. I then stamped the designs on and used Barry M's black nail art pen to fill in the eyes and the dolls' dresses.

Do you think I need practice?! ;-)
I do a lot of stamping but it's much more difficult where you have a specific image, rather than a pattern, that you need to get just right on your nails. I found the best way to stamp the dolls was to stamp from the tip of my nails downwards ~ but I still need to learn how to get the doll straight and not leaning drunkenly to one side!
Hugs,
Lisa xx
Thursday 19 December 2013
Christmas Teddy Water Decals
This post contains products which were sent to me for review :-)
Hello!
Today I am wearing these adorable Christmas Teddy decals sent to me from KKCenterHK. I've just come back from a group Christmas dinner and I received tons of compliments about them, which is always lovely and made me smile a lot!
The sheet has 25 decals featuring teddy bears in 5 different festive designs. Application was easy as usual: 30-60 seconds dipped in water then positioned on my nails and pressed down into place. For my base colour I chose Models Own's Raspberry Crush, a very vibrant red. I was extremely pleased at how opaque the decals are on the nail, especially over such a bright colour. Here they are:


Adorabubble!
You can buy these from KKCenterHK's massive water decal selection here:
http://www.kkcenterhk.com/Nail-Water-Decals-Festival/c106_145/p8459/N.NAIL-Xmas-Christmas-Bear-&-Gift-Water-Decals-Nail-Art/product_info.html
I am now going to stay nice and warm in bed with my laptop and a little ginger wine. I had 3 delicious courses at the Christmas meal and I am well and truly Stuffed. I don't think I can even move!
Hugs,
Lisa xx
Wednesday 18 December 2013
Starburst Blue Nail Foil
Hello!
After my review on Monday of KKCenterHK's lace nail foil, I decided to delve into my existing small foil stash and try out another one.
It is said that Picture Polish's Revolution base coat for glitters is the answer to a huge prayer - a top coat that will not wrinkle, dull or destroy shiny foils! This I had to try. So I applied my very shiny Starburst Blue foil (over blue polish in case I left any gaps) then added a coat of Revolution. Here is the result:


IT'S STILL SHINY!
There is a small amount of wrinkling but, by and large, the foil is as intact as when I applied it.
A small warning - I tried applying a coat of Seche Vite over the coat of Revolution on my thumb, hoping that Revolution would act as a barrier over the foil - and the whole thing cracked like a crackle polish! So it does have to be Revolution on its own.
Since Revolution isn't strictly a proper nail polish I do wonder what the wear time will be. Unfortunately I'll be changing my nails for a Christmas meal tomorrow but I'll be trying this again during the holidays to see how long the manicure lasts!
Hugs,
Lisa xx
Monday 16 December 2013
The Blogmopolitan Quiz
Hello!
I'm posting for the second time today because I like quizzes and wanted to do this one ^_^ It's called the Blogmopolitan Quiz and the template can be downloaded here. Thanks to Two Thirds Hazel!

Hugs,
Lisa xx
I'm posting for the second time today because I like quizzes and wanted to do this one ^_^ It's called the Blogmopolitan Quiz and the template can be downloaded here. Thanks to Two Thirds Hazel!
Hugs,
Lisa xx
Black Lace Flower Nail Foil
This post contains products which were sent to me for review :-)
Hello!
Today I have for you a manicure using this black lace nail foil from KKCenterHK. I normally review their water decals but spotted the foil on their website and it looked too good to be true; I had to get it!
Nail foil is a kind of transfer that is applied using a foil glue. It most often comes in very shiny, holographic colours but you can also get patterned designs like this floral lace. The best thing about non-shiny foils is that you can use top coat to seal the design and it doesn't affect the foil at all!
For application I first applied a very pale pink nail polish as my background colour, Crinoline by Sally Hansen. I then painted my nails with the little bottle of glue supplied and waited about 3 minutes for it to dry - you know it's ready when the glue goes from white to clear, or when you can feel that it's tacky to the touch. I then took the foil and pressed it onto the nail, making sure to press around the edges too. I finished the manicure with top coat. Here it is on both hands:


This is so "me" I can't even describe. It looks so French and romantic! I will be using it again and again and again.
To find a negative, the nail foil glue came with a brush that was too long for the bottle, meaning it was permanently bent out of shape. I had to cut the bristles so I could use it properly! That said, the glue itself was clearly very good as the foil applied fully with no bald patches.
You can buy the foil here, with the choice to buy it alone or with two different sizes of foil glue:
http://www.kkcenterhk.com/Nail-Foil-Transfer/c214/p12026/N.Nail-Noble-Black-Lace-Flower-Nail-Foil-Transfer/product_info.html
Hugs,
Lisa xx
Sunday 15 December 2013
Sally Hansen ~ Cha-Ching!
Hello!
Today I'm wearing an ultra-festive glitter by Sally Hansen. The Gem Crush glitter collection may be showgirl inspired but the two I own are so perfectly festive. I bought them a while ago for £1.99 each at my favourite Eldon Square market stall (Which seems to have disappeared! Does anyone know where it moved to?), which is a great deal as I've seen them at full price in many shops since.
Cha-Ching! is a full-cover polish consisting of fine red glitter with larger silver pieces. Basically Santa in a bottle! It took 3 coats for full opacity but it applies thinly and only needed one coat of Seche Vite to be smooth. Here it is:

Isn't she a beauty?! Perfect for Christmas.
I've started having to take photos outside in my back yard because there is so little sunlight at the moment and it's hard to get a good pic indoors. We really are in Winter... I'm just hoping for a little snow now ^_^
Hugs,
Lisa xx
Saturday 14 December 2013
Hello Kitty Winter Manicure
Hello!
Today I tried out a Hello Kitty French manicure with a Winter twist... the end result didn't turn out as I'd hoped but I wanted to show you anyway!

The French nails are Sinful Colors Snow Me White over MeMeMe's Graceful, using page reinforcer stickers as tip guides. I used a dotting tool and a nail art pen to make the Hello Kitty face :)
The accent nails are Nicole by OPI's All Kendall-ed Up with snowflake stamping using plate BM323.
I didn't like the manicure because the stamped accents and the dotted Hello Kitties don't go together at all, even more so in the flesh. Perhaps as two separate manicures they'd fare better!
Hugs,
Lisa xx
Wednesday 11 December 2013
Christmas Decals!
This post contains products which were sent to me for review :-)
Hello!
I'm not normally into Christmas, but I think making it along to the two festive markets in Newcastle has put me in the mood. I've been drinking lots of spiced Winter tea and hot ginger wine, bought a couple of presents and I've tried roast chestnuts for the first time ^_^
So I was extremely happy when I received some Christmas water decals from KKCenterHK yesterday! The ones I have on now are these Xmas water decals here. They come in a sheet of 25 decals with 5 different designs: a sleigh, a Christmas tree, a wreath, a moon and candy cane, and a wise man (or Santa, I can't decide!). I dipped them in water for 30-60 seconds then applied them over a base of a mislabelled light green Essie which may be called Shore Thing.


How cute?! I especially love the tall, slim designs of the tree and the wise man. Application was very smooth and simple; they adhered fully with no wrinkling.
You can buy the decals here:
http://www.kkcenterhk.com/Nail-Water-Decals-Festival/c106_145/p8442/N.NAIL-Xmas-Christmas-Santa-Claus-Moon-Water-Decals-Nail-Art/product_info.html
I have another sheet of Christmas water decals to try so I will be back soon with another festive manicure :-)
Hugs,
Lisa xx
Monday 9 December 2013
China Pattern Manicure
Hello!
Today's manicure has a china pattern as French tips and full accent nails. Luckily there was enough sunlight to photograph this, although it's not as vibrant as in the flesh!

Here's a step-by-step of what I did:
1. Painted a sheer French base of MeMeMe's Graceful on my index, middle and pinky fingers.
2. Painted 2 coats of Sinful Colors' Snow Me White on my ring finger and thumb.
3. Gave the French base lots of time to dry, then used page reinforcer stickers as French tip guides.
4. Painted white onto the tips and removed the stickers straight away.
5. After drying time, stamped the pattern from MoYou's Pro 07 plate using Barry M's Blackberry. Used page reinforcer stickers again as quick guides so I didn't stamp over the rest of the nail.
6. Plunged my nails into cold water for 30 seconds to set the polish.
7. Top coat!
Hugs,
Lisa xx
Sunday 8 December 2013
Remembrance Manicure
Hello,
Today's manicure is a muted floral. I painted 3 coats of OPI's Don't Touch My Tutu! as a sheer white voile. I then used Nails Inc's Bluebell and my MoYou Pro 07 stamping plate to add delicate lilac flowers.
The manicure is purposefully subtle and light as it's in remembrance of my nanna xx

I'm trying to start using my very much neglected Facebook page again, as it seems that lots of people prefer to follow bloggers on Facebook. Here is the page if you'd like to follow:
http://www.facebook.com/Lisa.GeordieNails
Hugs,
Lisa xx
Thursday 5 December 2013
Mind Manicure
Hello,
Today is not a wonderful day as there's been a bereavement in the family. I wanted to show you this manicure anyway as it represents the charity I love and volunteer for. Mind is a mental health charity and does really great work, both in campaigning on a national level and in providing vital support services locally. Both myself and family have benefitted from their help. I painted my nails in Mind's colours as I was meant to go to their annual general meeting today, but I didn't make it sadly.
The manicure is a sponged gradient, a technique I struggle with. That said, this attempt is an improvement on my last go! I started with 2 coats of Sinful Colors Snow Me White then swirled together the white with Barry M's Blackberry on a piece of scrap paper and applied it to my nail with a damp sponge.

I will continue to practise gradients as the effect is beautiful when it's perfected, as lots of inspiring bloggers have shown ~ the Nailasaurus comes to mind, and I've relied on her gradient tutorial when learning the technique.
Hugs,
Lisa xx
Monday 2 December 2013
Letter to Santa Manicure
Hello!
It's December already! Both my cat and I opened the first doors on our advent calendars yesterday (I got chocolate, she got cat treats) and I figured it was time to start wearing festive manicures! This mani has a "letter to Santa" theme.

For the French nails I painted a sheer base of MeMeMe's Graceful - this has been showing up a lot in recent manicures and it's my #1 recommended French shade. I used page reinforcer stickers as a tip guide and painted on Orly's Star Spangled, a sparkling jelly-red which came free with Cosmopolitan magazine this month. I added the white using Barry M's nail art pen.
For the accent nails I painted OPI's My Vampire Is Buff then stamped over a letter design by Bundle Monster. Everything was top coated and that's the manicure!
I'll try to think of more seasonal designs to adorn my nails for the rest of the month ^_^
Hugs,
Lisa xx
Friday 29 November 2013
Pink Glitter Gradient Manicure
Hello!
Today's manicure is an extremely sparkly pink glitter gradient. I bought the Nicole by OPI Kardashian mini set a while back and never got round to trying Wear Something Spar-Kylie, so here it is!


For this mani I painted a coat of MeMeMe's Graceful as a sheer French base then sponged a little pink polish over my nail tips in case the glitter didn't fully cover them. I then sponged on Wear Something Spar-Kylie ~ the base is slightly pink-tinted which looks nice when sponged ~ and topped it with two coats of Seche Vite for a glassy finish.
A happy side effect of this manicure is that I found that sponging a colour onto your tips makes for a beautiful French manicure! I will definitely revisit this.
Hugs,
Lisa xx
Tuesday 26 November 2013
Floral Purple French
Hello!
I cut my nails short over the weekend as the cold weather really wasn't doing them any favours, so I will be experimenting with ideas for short nails for a little while!
Today's manicure is a purple French tip with white floral stamping over it. For the tips I used page reinforcer stickers as guides and painted further down than my natural nail tip - I have long nail beds and this makes my nails look nicely in proportion! I then painted a coat of MeMeMe's Graceful, a sheer French shade, then stamped over the lot using Konad plate m71.

I feel this French look is great for people like me with short nails yet long nail beds and long fingertips. When I cut my nails I'm only left with 1-2mm of white at most and it always looks a bit rubbish for a while!
Hugs,
Lisa xx
Saturday 23 November 2013
Jade ~ Vestido de Gala (Again!)
Hello!
This weekend I wanted a quick-but-striking manicure in case I feel up to going out at some stage, and Jade's Vestido de Gala was my choice. Rich squishy berry purple with holographic sparkles, jelly finish but opaque in 2 coats, perfect!

This polish makes me think of spiced berry tea, a lovely connotation since it's so very cold. Brrrrrrrrr!
Thanks go to Sally Magpies who I won the polish from a few months ago ^_^
Hugs,
Lisa xx
Friday 22 November 2013
Frills & Dots Manicure
Hello!
Today I tried a manicure idea that didn't work out too well, but I wanted to show you anyway :-)
For my base colour I painted 3 coats of OPI's Don't Touch My Tutu!, a sheer white shade. Then I stamped the ribbon frill pattern from Konad's m71 plate down the side of my nail. On the rest of the nail I stamped polka dots using this plate from KKCenterHK.

As you can see the fail is in my clumsy stamping! I didn't quite get the frilly edge aligned right and my dots are a bit haphazard. I still quite like the idea though so never mind, at least I tried!
Hugs,
Lisa xx
Tuesday 19 November 2013
Blossom Manicure
Hello!
Today's manicure is a revisit of this design I did a few months ago, inspired by a keepsake box I have which has silver fabric with a blue and pink cherry blossom print. This time I used my MoYou Pro 07 plate for stamping as this has quite a similar blossom pattern to the box. The polishes are the same though: Revlon's Metallic, Sally Hansen's The Sky's The Limit and Barry M's Grapefruit.

I'm considering asking for a couple of the new MoYou plates for Christmas as they really are beautiful and innovative, but I'm still a bit wary after my first order. People seem to be raving about the brand in stamping and polish groups, yet I know there have been a lot of order mixups and my Pro 07 plate is badly etched in places. I'd really like to hear more about other people's experiences so please do leave a comment if you have ordered from MoYou and tried your plate(s)!
Hugs,
Lisa xx
Sunday 17 November 2013
Red & Polka Dot French
Hello!
Today I've continued to experiment with French manicures, this time with a vintage feel ~ cheerful red tips and polka dots!
I used page reinforcer stickers as a manicure guide (I like the very rounded look) and painted the tips with Models Own's Raspberry Crush, one of my favourite reds. I then stamped white polka dots over the entire nail using this plate from KKCenterHK and top coated the lot.


I'm glad to be venturing back into Frenches after avoiding the look for a long time, so I might be back soon with another attempt ^_^
Hugs,
Lisa xx
Thursday 14 November 2013
Accented French
Hello!
Today's manicure is a little different from my normal style. Normally I avoid French manicures as:
a) I can't do them well, even with tip guides, and
b) they tend to remind me of Essex-style false nails which I'm not a fan of!
However, I had the unexplainable urge to do a French with ultra-glittery accents and a decal to boot, so here I am!

For the French nails themselves I took lots of time for proper drying and to get them perfect. As a tip guide I used round page reinforcer stickers. My white was Sinful Colors' Snow Me White and my sheer was MeMeMe's Graceful. Both of these I recommend; Snow Me White gives great coverage and Graceful has a wide brush which is perfect for getting a one-coat even finish.
The glittery accents are Nails Inc's Marylebone, topped with a liberal coat of Gelous then Seche Vite.
The water decal is by YRNails, a UK nail decal store; I bought the love trees here.
I'm not sure if this manicure is to everyone's taste (I wasn't sure if it was to my taste!) but it's nice to experiment and to keep trying out new ideas!
Hugs,
Lisa xx
Wednesday 13 November 2013
Forest Animal Manicure
This post contains products which were sent to me for review :-)
Hello!
Today I'm very happy as I am back on my laptop after it being out of action since Sunday! The charger broke and I've been waiting for a new one, which my brilliant dad got for me. As a result I've had photos of this manicure sitting on my phone, and I'm very glad to be showing you after the little delay!
This manicure uses water decals I was sent from KKCenterHK: a gorgeous collection of woodland animals. As well as bunnies, chipmunks, squirrels and deer there are cute little apple, nut and storybook designs to complement them. I count over 60 decals on the sheet. Application was very easy; the decals are all individual so I cut roughly around them, placed them in water for maybe 40-50 seconds then slid them off the backing paper and pressed them where I wanted onto my nails.
For the manicure overall I decided to paint my nails a light latte colour, Sally Hansen's Without A Stitch, with glittery accent nails of Nails Inc's Noel Street on my thumbs and ring fingers. I added the adorable decals and this is the end result:


I love these so much! The decals are incredibly high quality and are just plain adorable. Thoroughly recommend, I'll be using these again in Winter manicures to come.
You can buy the decals here: http://www.kkcenterhk.com/Nail-Water-Decals-Animals/c106_147/p10723/N.NAIL-Forest-Rabbit-Bunny-Deer-Bambi-Squirrel-Hamster-Apple/product_info.html
Hugs,
Lisa xx
Saturday 9 November 2013
Chinese Blossom Water Decals
This post contains products which were sent to me for review :-)
Hello!
Today I have some more lovely water decals from KKCenterHK to show you. This is a sheet of 20 blossom tree designs, vibrant in colour and with little gold glitter accents in the heart of the flowers.
Application was very easy; I cut the decals out, placed them in water for about 30 seconds then slid them off the backing paper and positioned them onto my nails. The decals are all individual so I didn't have to be neat when cutting around them, and they're fairly large so they weren't fiddly to handle. They adhered to the nail smoothly with no wrinkling or seam line. Here they are!


My base manicure is Rimmel Star Studded over white to really show off the colours. They're romantic and really special!
You can buy the decals and see the full sheet here: http://www.kkcenterhk.com/Nail-Water-Decals-Festival/c106_145/p10356/N.NAIL-Chinese-Pink-Love-A-Peach-Blossom-Water-Decals-Nail-Art/product_info.html
Hugs,
Lisa xx
Subscribe to:
Posts (Atom)